
This image is designed to be printed fairly large, at least 3" wide, but you'll have an easier time coloring if it is between 3-3/4" to 4" wide.
If you choose to color it mainly white, that is what makes it really easy, because you don't need too many colors. You could choose to color it brown like oak wood and it is only a little bit more work, but not really too much more, as you will see on the second tutorial.
~~~~~~~~~~~~~~~~~~~~~~~WHITE WOOD GAZEBO~~~~~~~~~~~~~~~~~~~~~~~~~~
(Brown tone tutorial is below the white gazebo tutorial)
Here is the completed image and below are the coloring steps.Colors used: SU marker Marina mist, Tombow markers N65, N75, 228

~~~~~~~~~~~~~~~~~~~~~~~~~~~~~~~~~~~~~
1. I chose to use light gray as my shadows for the white wood. This light color was easy to apply and not worry about getting too much. It blended really easy too. Look carefully at the picture below. You can see every place where I drew a line of the gray following the wood panels in the places I thought would be shadowed. That is all the color you need to create the depth in the image.
2. Using the waterbrush and making sure it has a little flow of water so that it is wet, but also making sure that it is not flowing too much, brush the tip along each line of gray. Brush it once or twice at the most. It will blend out just a little which is all you need. I started at the bottom and worked my way up.

3. Here is how it looks after I've gone over each of the light gray shadows.

4. Time for the roof. I wanted the roof to be a shade darker of gray. I added lines on the creases and in just a few lines horizontally.

5. Using the same waterflow as with the white parts of the gazebo, lightly go over just once or twice in back and forth motions. Below is how it looks after blending with the waterbrush. If you want, add just a few more strokes of the marker overtop the roof in the shadowed areas while it is still damp, to accentuate the shadowing.
Wait for everything to dry completely before you move on.

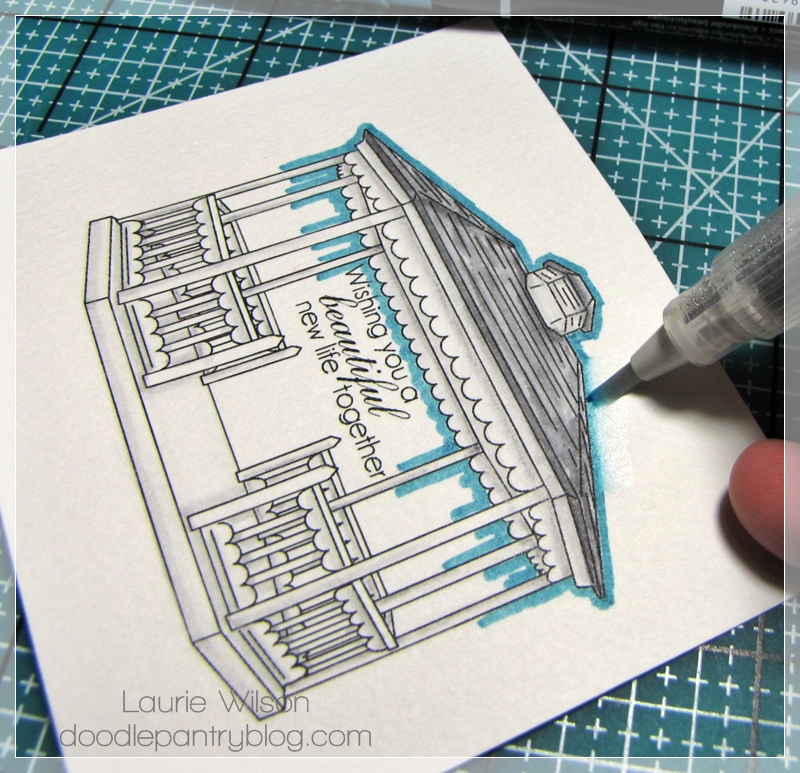
6. Time for the sky. I used Stampin' Up! Marina Mist marker. You can see all the lines that I added below.

7. Your waterflow needs to be pretty wet, but not "pooling". To blend around the gazebo for the sky, start in one section about an inch wide on the top. Blend back and forth touching the color and then moving your tip outward while still brushing side to side. See photos below.
8. Once one section is done, immediately move to the adjacent section and do the same thing.
9. You may need to quickly go back over a portion of the previously blended area to blend the two areas seamlessly together. That will all depend on your waterflow and how quickly you work.


10. Finish blending the sky blue areas. Wait for everything to dry completely before you move on.

11. I added the green for grass like below. One line directly under the gazebo base, and then using the writing tip added little grass blade clumps.

12. Using the waterbrush, blend just once over the bottom areas of the grass, and don't touch the tips of the blades that extend onto the gazebo base. Move downward with the brush tip so that it fades out. Wait until it completely dries before moving on.

13. Using the write tip again on the marker, add more lines for grass blades over the blended area.
14. Add tiny grass spots inbetween the railing bars in the back of the gazebo


14. Finally, using the same marker color as for the roof, add color to where the underside/inside of the gazebo roof.

Here is the finished card of the white gazebo.

(SUPPLIES list at bottom of post.)
~~~~~~~~~~~~~~~~~~~~~~~BROWN WOOD GAZEBO~~~~~~~~~~~~~~~~~~~~~~~~~~
If you want to attempt a brown color wood gazebo, here is a simplified coloring tutorial of one way to make your gazebo brown wood tones.
Colors used: Tombow markers 192, 177, 526, 942, 947, 899
Colors used: Tombow markers 192, 177, 526, 942, 947, 899
1. I chose 3 shades of brown (Tombows 942, 947, 899) and used the lighter color first. I stared at my image for a few minutes while I decided which parts would be which shade.
I put a thin line of the lightest brown in areas on the scallop trim and base where I think would be "shaded" if a light source existed.


3. Before it dried, I went over again, the same lines I originally created, with the same lightest color of brown. This just helped to put back the depth of these areas. Allow to completely dry before moving onto the next color.

4. The medium brown is for the railings, beams and trim around the roof. As you can see, I forgot the roof trim and a portion of the left front beam before I took the photo below. I filled those in as I was using the waterbrush in step 5.

5. I used the waterbrush and swept over each area lightly only once to blend the color out. I didn't want to mess with this color too much. Allow to completely dry before moving onto the next color.

6. Finally I added the darkest brown to the roof shingles. This is such a dark color, so just use a little in a few areas, following the lines in the roof.

7. I only brushed over this section once as well. I wanted it to blend enough to spread the color around, but I didn't want too much water or too much flow. I started on the left top with the waterbrush tip, worked my way down the left side of the roof, brushed off the excess color from the tip of the waterbrush onto a paper towel, and then started again at the top of the middle section of the roof, brushing side to side until I reached the bottom of the roof. Then finished the right side of the roof. Allow to completely dry before moving onto the sky and shrubbery.

That's all for the wood color tutorial. The sky and greenery is pretty much the same techniques as shown above on the white gazebo. Except this image has defined shrubs and swags.
You can see that the addition of the sky and greenery really finishes the image out and gives it a little life.

Here is the finished card. I added white flowers to the shrubs and swags using a white gel pen.


~~~~~~~~~~~~~~~~~~~~~~~~~~~~~~~~~
SUPPLIES for white gazebo card:- IMAGES: Cozy Gazebo, Love Sentiments by Doodle Pantry
- CS/PAPER: 90 lb. watercolor paper, CDS mossy woods, SU marina mist, FancyPants Road Show DP
- INK: printer, SU marker Marina mist, Tombow markers N65, N75, 228
- ACCENTS/TOOLS: waterbrush, sewing machine, foam pop hex dots, Prima Say it with pearls, flower soft fushia and flower soft glue
SUPPLIES for brown wood gazebo card:
- IMAGES: Cozy Gazebo, Love Sentiments by Doodle Pantry
- CS/PAPER: 90 lb. watercolor paper, white, CDS spring leaf, CDS mud pie, Basic grey marrakech DP
- INK: printer, white gel pen, Tombow markers 192, 177, 526, 942, 947, 899
- ACCENTS/TOOLS: waterbrush, sewing machine, EK border punch, SU mini flower punch, Paper studio 1" daisy punch, CDS spring leaf ribbon, pearls, foam pop hex dots


6 comments:
Wow, awesome tutorial, Laurie. You certainly are the master ;D
what a wonderful tutorial! Makes me want to get this image! :D
WOW, sooo PRETTY! I love it on watercolor paper Laurie... I'm gonna try that next! I miss watercoloring. Fabulous tutorials! =)
Wow Laurie absolutely gorgeous! Thanks so much I really needed this, lol!
Much more than just a little inspiration. My gosh, I love both of your cards done with this awesome set. I do have a question with regard to your tutorial. My waterbrush always puts out too much water. Do you use an easel so the waterbrush is not pointing down so the flow is easier to control?
Laurie this is a fabulous tutorial! I've learned much from this. :)
Post a Comment