Hello friends!
Here is a coloring tutorial for the
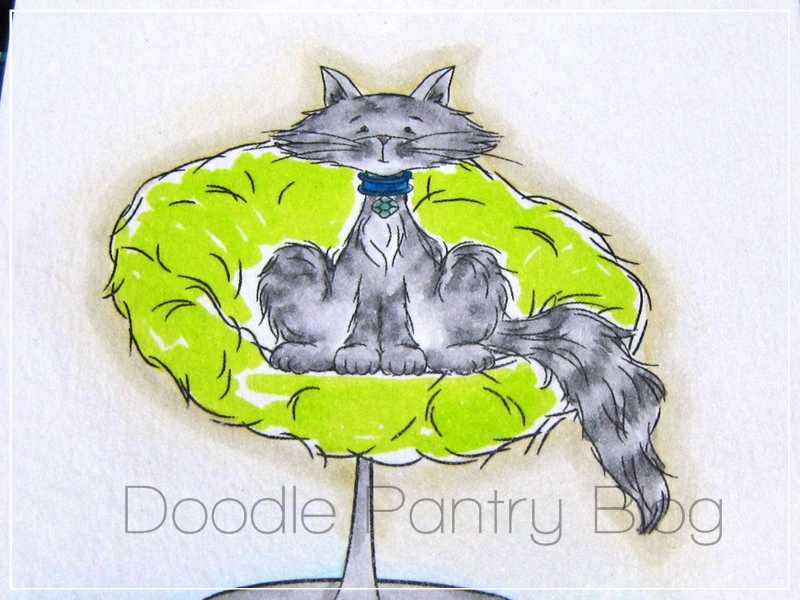
Shaggy Cat image. I had to make my neighbors a thank you card today. They cat sat for 9 days while we were out of town, and they must have taken really good care of her because she wasn't even mad at us when we got back, LOL. I colored the cat to match my kitty, a gray stripe tabby.
Finished Card:
Coloring items needed:
- Waterbrush
- Paper towel for wiping waterbrush tip
- Tombow markers 133, 126, N65, N75, 990, 526, 491, 312, and S'U! early espresso marker
I added 990 and 491 around the objects.
Using the waterbrush, I just swept the brush tip back and forth and then away from the image, all around each object until blended out.
Next step add the dark gray N65 to the seat base and blend.
I added the lighter gray N75 to the kitties body and left a few areas without color, the chin, the chest, and underside behind the front legs. Blend with waterbrush by starting in the white areas and moving outward. For this coat, I am just laying down the base color, so I am not too worried about shading yet.
Using the darker gray N65 fine tip, add some short strokes, in lines, for where you want stripes, and then inside ears.
Make sure the brush flow is slightly wet, but not fast flowing out of the tip. You can do this by brushing on a paper towel and you can see how much water is soaked by the towel. Once the flow is slight, touch the tip of the waterbrush to the darker strokes on the face and lightly brush in a quick squiggle motion across each darker gray lines, until blended like below. I also added some dots on the cheeks and blended those.
Similar idea for the body now, use the darker gray and add short strokes in the shape of stripes on the fur.
With light waterflow in the waterbrush, blend the darker gray into the lighter gray areas.
Chair: I loosely added color to the main areas of the chair with the lightest lime green 133. Do not waterbrush yet. I also colored the collar and jewel with 526 and 312, but didn't water blend those.
Add the darker lime green 126 to the undersides and shadows on the fuzzy chair. You can now add the waterbrush and start in the lighter green areas and work your way in small circles or strokes in outward directions until you get to the edges of the chair.
After a quick blend, it should look like below.
Here is where I needed to add a darker shadow only on the south and north sides of the chair, I used SU Early Espresso marker. Add just a small amount of the darker color, hugging the edges. Touch it with the waterbrush tip and pull outward.
Below shows the darker "highlights", which help accentuate and make the kitty chair pop out.
Once the chair color was dry, I decided I wanted a bit more contrast in the shadows on the fur on the chair. I added more of the darker lime color 126 in the shadow areas and you can see that below.
Finally, blended the extra shadows by touching the brush to the lighter areas and moving it toward the shadow colors. Try not to overblend or the paper will pill up.
Finished card close-up detail:
I added the white gel pen highlights to the chair stand and the sparkle fibers after the card was completely put together. I first put some of the Flower Soft glue onto my fingertip and then quickly rubbed a thin layer of it over one half of the chair. Quickly (because it dries fast) sprinkled a tiny bit of the sparkle fibers over it and then used a clean finger to push it in. Tapped off excess and did the other side the same way. It adds just enough sparkle and fluff but not too much, and I can still see the color underneath since the Flower Soft glue dries clear.
SUPPLIES:
- Digital Image: Shaggy Cat by Doodle Pantry
- CS/paper: 90 lb. Canson waterclor paper, SU not quite navy, SU retired Kiwi Kiss, Basic Grey Marjolaine DP
- Ink: Laser printer, Tombow markers 133, 126, N65, N75, 990, 526, 491, 312, and S'U! early espresso marker, white gel pen (on chair base stand)
- Accents/Tools: waterbrush, circle punch, inverted scallop circle die, corner rounder punch, flower soft glue and sparkle fibers lime, patina stickles (on collar jewel), sewing machine, Offray walmart ribbon "lemongrass" color, retired Su button, linen thread, pearls, foam pop dots
Thanks for visiting today and hope you enjoyed a little coloring tutorial!


6 comments:
wow laurie , you know iam a catlover , this one is so cute, love the fluffy on the chair, i color now with distress, i never try to make a shadow line, but i think i can do the same techniek hugs christa
Amazing Laurie! I going to try the tutorial with my prisma markers, they seem to blend really well. Thanks for much!
WOW! You make it look so easy!! =D LOVE IT! Great job and thanks for sharing your tutorial!
Awesome card!
Wow Laurie...this is a beautiful card. I an new at shading and this all makes sense to me now. Thanks for the great lesson. Hugs XX
I love watercoloring with Tombows and would love to do the same with digis. But I have a question. When you print your digi onto the watercolor paper, and then paint it, how do you not wash off the printed design? When I try this tech. the lines bleed or fade out with the water. Thanks for any help!
Post a Comment