Pages

QUICK LINKS

I AM SORRY! SHOP IS CLOSED, BUT STILL VIEWABLE AS A CATALOG REFERENCE. ALL TERMS CONDITIONS AND COPYRIGHTS REMAIN and YOU MAY NOT SELL IN ANY FORM, PRODUCTS YOU HAVE PURCHASED FROM DOODLE PANTRY

Monday, January 31, 2011

Faith as a mustard seed

Today we are sponsoring the Paper Playtime Challenge!   Theme is anything goes.    I hope you can join us and play along this week at Paper Playtime!

(Before I get into the card, I want to send a note to Sonya A. I did get your message and I did reply, I hope you got the information. Please check your junkmail folder.)

Here's a quick somethin' I pulled together last night using the mustard plant from Holy Land Flowers 3.
I printed the image on Canson 90 lb. watercolor paper using a laser printer, and watercolored the image with Tombow markers and a waterbrush.
 
Here are my supplies used:
  • IMAGE: Holy Land Flowers 3
  • CS/PAPER: Canson 90 lb. watercolor paper, CDS spring leaf, CDS fresh papaya, mustard CS for base, Basic grey Origins DP
  • INK: printer, white gel pen, Tombow markers 515, 177, 020, 991
  • ACCENTS/TOOLS: waterbrush, corner rounder, CDS fresh papaya ribbon, Basic grey button, linen thread, foam pop dots, Martha border punch, mini mosaic square tiles, pearls, sewing machine
~~~~~~~~~~~~~~~~~~~~~~~~~~~~~
Thank you for visiting today.   I hope you have been inspired to go create something.  We have new releases coming on February 5, check back with us on saturday for new inspiration with those.

Saturday, January 22, 2011

Cozy Gazebo coloring tutorial

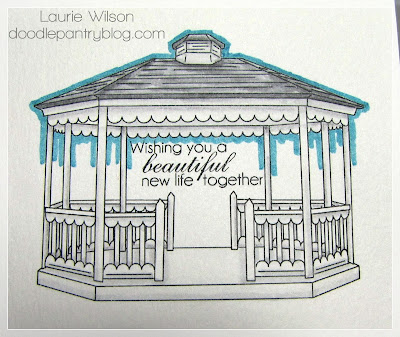
Good morning!   Time for a coloring tutorial of Cozy Gazebo, and sentiments from Love Sentiments.  And this one really is easier than it may initially look.
This image is designed to be printed fairly large, at least 3" wide, but you'll have an easier time coloring if it is between 3-3/4" to 4" wide.

If you choose to color it mainly white, that is what makes it really easy, because you don't need too many colors.  You could choose to color it brown like oak wood and it is only a little bit more work, but not really too much more, as you will see on the second tutorial.

~~~~~~~~~~~~~~~~~~~~~~~WHITE WOOD GAZEBO~~~~~~~~~~~~~~~~~~~~~~~~~~
(Brown tone tutorial is below the white gazebo tutorial)  
Here is the completed image and below are the coloring steps.

Colors used:  SU marker Marina mist, Tombow markers N65, N75, 228

~~~~~~~~~~~~~~~~~~~~~~~~~~~~~~~~~~~~~
1. I chose to use light gray as my shadows for the white wood.  This light color was easy to apply and not worry about getting too much.  It blended really easy too.  Look carefully at the picture below. You can see every place where I drew a line of the gray following the wood panels in the places I thought would be shadowed.  That is all the color you need to create the depth in the image.

2. Using the waterbrush and making sure it has a little flow of water so that it is wet, but also making sure that it is  not flowing too much, brush the tip along each line of gray. Brush it once or twice at the most. It will blend out just  a little which is all you need.  I started at the bottom and worked my way up.

3.  Here is how it looks after I've gone over each of the light gray shadows.

4. Time for the roof. I wanted the roof to be a shade darker of gray. I added lines on the creases and in just a few lines horizontally.

5. Using the same waterflow as with the white parts of the gazebo, lightly go over just once or twice in back and forth motions. Below is how it looks after blending with the waterbrush.  If you want, add just a few more strokes of the marker overtop the roof in the shadowed areas while it is still damp, to accentuate the shadowing.
Wait for everything to dry completely before you move on.

6.  Time for the sky.  I used Stampin' Up! Marina Mist marker. You can see all the lines that I added below.

7. Your waterflow needs to be pretty wet, but not "pooling".  To blend around the gazebo for the sky, start in one section about an inch wide on the top. Blend back and forth touching the color and then moving your tip outward while still brushing side to side. See photos below. 
8. Once one section is done, immediately move to the adjacent section and do the same thing.
9. You may need to quickly go back over a portion of the previously blended area to blend the two areas seamlessly together. That will all depend on your waterflow and how quickly you work. 


10. Finish blending the sky blue areas. Wait for everything to dry completely before you move on.

11. I added the green for grass like below.  One line directly under the gazebo base, and then using the writing tip added little grass blade clumps.

12. Using the waterbrush, blend just once over the bottom areas of the grass, and don't touch the tips of the blades that extend onto the gazebo base. Move downward with the brush tip so that it fades out. Wait until it completely dries before moving on.

13. Using the write tip again on the  marker, add more lines for grass blades over the blended area.
14.  Add tiny grass spots inbetween the railing bars in the back of the gazebo


14. Finally, using the same marker color as for the roof, add color to where the underside/inside of the gazebo roof.
I added some flower soft to the base to finish it off and add a splash of color.
Here is the finished card of the white gazebo.
(SUPPLIES list at bottom of post.)

~~~~~~~~~~~~~~~~~~~~~~~BROWN WOOD GAZEBO~~~~~~~~~~~~~~~~~~~~~~~~~~
If you want to attempt a brown color wood gazebo, here is a simplified coloring tutorial of one way to make your gazebo brown wood tones.

Colors used: Tombow markers 192, 177, 526, 942, 947, 899

1. I chose 3 shades of brown (Tombows 942, 947, 899) and used the lighter color first.  I stared at my image for a few minutes while I decided which parts would be which shade.
I put a thin line of the lightest brown in areas on the scallop trim and base where I think would be "shaded" if a light source existed.
2.  I used a lightly flowing waterbrush and swept the tip only once, or maybe twice over each section.

3. Before it dried, I went over again, the same lines I originally created, with the same lightest color of brown. This just helped to put back the depth of these areas.  Allow to completely dry before moving onto the next color.

4.  The medium brown is for the railings, beams and trim around the roof. As you can see, I forgot the roof trim and a portion of the left front beam before I took the photo below.  I filled those in as I was using the waterbrush in step 5.

5.  I used the waterbrush and swept over each area lightly only once to blend the color out. I didn't want to mess with this color too much.  Allow to completely dry before moving onto the next color.

6. Finally I added the darkest brown to the roof shingles.  This is such a dark color, so just use a little in a few areas, following the lines in the roof.

7. I only brushed over this section once as well. I wanted it to blend enough to spread the color around, but I didn't want too much water or too much flow.  I started on the left top with the waterbrush tip, worked my way down the left side of the roof, brushed off the excess color from the tip of the waterbrush onto a paper towel, and then started again at the top of the middle section of the roof, brushing side to side until I reached the bottom of the roof.  Then finished the right side of the roof.  Allow to completely dry before moving onto the sky and shrubbery.

That's all for the wood color tutorial.  The sky and greenery is pretty much the same techniques as shown above on the white gazebo.  Except this image has defined shrubs and swags.
You can see that the addition of the sky and greenery really finishes the image out and gives it a little life.

Here is the finished card. I added white flowers to the shrubs and swags using a white gel pen.


~~~~~~~~~~~~~~~~~~~~~~~~~~~~~~~~~
SUPPLIES for white gazebo card:
  • IMAGES: Cozy Gazebo, Love Sentiments by Doodle Pantry
  • CS/PAPER: 90 lb. watercolor paper, CDS mossy woods, SU marina mist, FancyPants Road Show DP
  • INK: printer, SU marker Marina mist, Tombow markers N65, N75, 228
  • ACCENTS/TOOLS: waterbrush, sewing machine, foam pop hex dots, Prima Say it with pearls, flower soft fushia and flower soft glue

SUPPLIES for brown wood gazebo card:
  • IMAGES: Cozy Gazebo, Love Sentiments by Doodle Pantry
  • CS/PAPER: 90 lb. watercolor paper, white, CDS spring leaf, CDS mud pie, Basic grey marrakech DP
  • INK: printer, white gel pen, Tombow markers 192, 177, 526, 942, 947, 899
  • ACCENTS/TOOLS: waterbrush, sewing machine, EK border punch, SU mini flower punch, Paper studio 1" daisy punch, CDS spring leaf ribbon, pearls, foam pop hex dots
Thanks for stopping by today, I hope you found a little inspiration!

Thursday, January 20, 2011

The Winner of DPDC5!

Hello!
(ACK!  I'm sorry, I not only did a typo earlier, but copied the wrong name as the winner... it's what happens when I start clicking too fast before the computer is done refreshing the page... I am SO SORRY!  I have edited this post) (As a consolation to the wrongly announced winner previously, I have contacted you.)

THANK YOU to all the wonderfully creative projects that were entered last challenge!
Random picked #17 as the winner for Doodle Pantry Digital challenge #5!
Who is....
JENN ZEEB

Congratulations Jenn!  You have been emailed your prize coupon.
The next challenge is already posted and there are 4 chances to win on that one, I hope you can play with us again!

A few new release projects

Hello!
I hope you've all seen the New release post and Challenge 6 post, both just before this one!
Below I am sharing the details on 3 cards I made using the new releases.

I have been wanting to combine these baby farm animals for a long time and knew I had to wait until I had the cow.
This is how it looked on my Word document for printing.
I placed the piglet first, then the cow, then the horse and finally the goat.   It took quite some time to color, but I just am so happy with the end result!


Here is the finished card:


For the grass in the bottom right corner, I just used the writing tip of the Tombow marker and made clumps of grass blades with it to fill the area. Then I lightly (with light water flow) brushed over the clumps in up and down strokes with the waterbrush. I waited for that to dry completely and then used the writing tip again to make blades of grass again over top everything. After all that, I wanted the grass to match the grass under the horse, so I used my Zig Millenium fineliner to draw just a few grass clumps in there.

SUPPLIES:
  • IMAGES: Baby Cow, Baby Horse, Precious Piglet and Baby Goat from Doodle Pantry
  • CS/PAPER: 90 lb. watercolor paper, CDS spring leaf, CDS mud pie, CDS cream soda
  • INK: printer, Tombow markers 850, 912, 491, 098, 177, 990, 992, 947, 899, 977, 985, 946, black zig millenium
  • ACCENTS/TOOLS: waterbrush, border punch, glue dots, CDS mud pie ribbon, button, thread, sewing machine

~~~~~~~~~~~~~~~~~~~~~~~~~~~~~~~~~~~

Next card I couldn't believe I didn't sew!  I wanted to, but decided to resist it as sort of a challenge to myself... I needed to see if I could make a card without sewing on it and still like the outcome, LOL!   I actually like it.  It's on the simpler side.  I used some matching digi paper that comes with the Nutty for you set.
SUPPLIES:
  • IMAGES: Nutty for you by Doodle Pantry
  • CS/PAPER: white, CDS worn parchment, CDS pineapple twist, digi paper included in digi set
  • INK: color printer
  • ACCENTS/TOOLS: spellbinders octagons and ovals dies, fern punch, ivory taffeta ribbon, pearls, foam pop dots
~~~~~~~~~~~~~~~~~~~~~~~~~~~~~~~~~~~
Finally I had to color the Spring Song Birdies.  I just got this Basic Grey Hopscotch paper last weekend and was itching to do some cute springy card with it.
They were a tad bit tedious to color, but SOOOO much fun!
SUPPLIES:
  • IMAGES: Spring Song Birdies by Doodle Pantry
  • CS/PAPER: 90 lb. watercolor paper, CDS deep sea, CDS soft mint, Basic grey Hopscotch DP
  • INK: printer, Tombow markers 312, 243, 062, 991, 873, 992, 899, 491, 526, N15
  • ACCENTS/TOOLS: waterbrush, spellbinders labels 13 dies, Su oval punches, border punches, CDS sheer ribbon, paper primas, pearls, sewing machine, foam pop dimensions
~~~~~~~~~~~~~~~~~~~~~~~~~~~~~~~~~~~
I thank you for stopping in to visit!  I enjoy every comment and I sincerely hope you have been inspired to go create something!

Doodle Pantry Digital Challenge 6

Hello! This is Katlyn, and I'd like to welcome you to Doodle Pantry's 6th challenge!  I'm so happy you've joined us, and I hope you will enjoy this week's theme!
 
Tag/Keyword: DPDC6
  1. The theme for this challenge is love!  Love as in friendship, love as in a wedding, or love as in Valentines...  There is lots of room for interpretation!
  2. You may submit projects using any company DIGITAL image, but it must be a digital image.  However, we of course LOVE to see what you can do with Doodle Pantry Images if at all possible. Feel free to browse the freebie page HERE, if you'd like to use one at no cost.
We hope you can play along with us!


The PRIZE for one randomly selected participant is a $10 Doodle Pantry Store Coupon!
And then 3 entries will be chosen as TOP 3, of whom will receive 1 free Doodle Pantry product 
THAT IS 4 CHANCES TO WIN!

Other challenge guidelines below:
  1. Each challenge has a specific theme and it is expected that you will create something NEW and follow the challenges theme. 
  2. Post your creation on your blog or online public gallery in which a comment can be left.  Post MUST be dated within the time frame of the challenge.  Please, no past creations, create something new!  
  3. The linky widget may state that a URL is not required, but IT IS REQUIRED. You MUST LINK YOUR POST of your project/card
  4. Challenges are open for 2 weeks and winners posted the day prior to the next challenge (on the 4th)
  5. Only enter once per each challenge
  6. Keywords or tags for the challenge are DPDC and the number of the challenge, no spaces.
************************************
Here are some of the DT creations to help get your creative juices flowing!

 Laurie Wilson, Pat Dadisman, and Christa Mulder using Nutty for You


We hope you have been inspired today, and we hope you can join us.   Thanks so much for stopping by and we wish you a wonderful week!

New releases today!

Good morning!    Today we have 5 new releases to share.

Right after the release on the 5th, we underwent a server switch (to make the site faster) and then the server was unexpectedly having maintenance done on it.  I think the problems were intermitent for about a week!  It caused a lot of problems with downloads and emails not being sent.
I want to give you a little discount this time, 4 days only, as appreciation for your continued support and patience as we worked to get the site running smoothly again.

Here are the newest releases!
BABY COW - I just HAD to include a baby cow for the baby farm animals collection

COZY GAZEBO - A little scenery for some pretty cards

HOLY LAND FLOWERS 3 (almond and mustard) - includes scriptures

SPRING SONG BIRDIES - these birdies are singing the sweet tunes of spring


NUTTY FOR YOU - Just some whimsical, fun, nut-loving squirrels


......................................................................................
Stay tuned... Katlyn is hosting the Doodle Pantry Digital Challenge 6 (theme is anything love, or things representing any kind of love), and then I will be posting a few creations with these releases.
Later this week, I will post a coloring tutorial on the Cozy Gazebo!
Thanks for checking in on us this week, I hope you'll play our challenge... there are lots of chances to win!
I hope you find some inspiration to go create!
~Laurie