Pages

QUICK LINKS

I AM SORRY! SHOP IS CLOSED, BUT STILL VIEWABLE AS A CATALOG REFERENCE. ALL TERMS CONDITIONS AND COPYRIGHTS REMAIN and YOU MAY NOT SELL IN ANY FORM, PRODUCTS YOU HAVE PURCHASED FROM DOODLE PANTRY

Tuesday, November 30, 2010

Cards for inspiration

Hello!  I just posted the winner of DPDC2, check it out and see who the winner is and who the top 3 are.
.........................................................
I have a few cards to show you with the details with them.  I hope you are inspired to go create something!
This card is 3.25x6.25
I watercolored the huckleberries image with Tombow markers and a waterbrush on watercolor paper.
I added white gel pen highlights on the berries.
SUPPLIES:
  • DIGITAL IMAGE: Huckleberries by Doodle Pantry
  • CS/PAPER: Canson 90 lb. watercolor paper, Night of Navy, CDS pretty porcelain, My Minds Eye PennyLane DP
  • INK: Laser printer, Tombow markers 942, 947, 228, 249, 772, 847, 676, SU Night of navy marker, white gel pen
  • ACCENTS/TOOLS: waterbrush, MS border punch, EK border punch, pearls, navy organdy ribbon, sewing machine, foam pop dots, glue dots
  • COLORING: watercolor by Tombow markers and a waterbrush
~~~~~~~~~~~~~~~~~~~~~~~~~~~~~~~~~~~~
This is an A2 size card, 4.25x5.5
I watercolored the gift bunny image with Tombow markers and a waterbrush on watercolor paper.   I used white gel pen to add fluffiness to his paws, tail and cheeks.

SUPPLIES:
  • DIGITAL IMAGE: Gift Bunny by Doodle Pantry
  • CS/PAPER: Canson 90 lb. watercolor paper, pumpkin, CDS grape jelly, Best Occasions DP from walmart
  • INK: Laser printer, Tombow markers 879, 899, 992, 772, 177, 933, 606, 443, white gel pen
  • ACCENTS/TOOLS: waterbrush, purple gingham ribbon, sewing machine, pearls, glue dots, foam pop dots
  • COLORING: watercolor by Tombow markers and a waterbrush
~~~~~~~~~~~~~~~~~~~~~~~~~~~~~~~~~~~~~~
Here's a quick card using the pre-colored digital Happy Birdie B image.
Card is 4.25x4.25
No coloring here, just printed and pasted!
SUPPLIES:
  • DIGITAL IMAGE: Happy Birdie B (pre-colored image) by Doodle Pantry
  • CS/PAPER: Neenah white, kiwi kiss, pumpkin pie, DCWV Citrus stack DP
  • INK: Laser printer
  • ACCENTS/TOOLS: Square brads, SU oval punch, sewing machine, foam pop dots
............................................................................
I thank you for stopping by today, your visit is sure to bring a smile my way, and I welcome any questions!

DPDC2 challenge WINNER!

Good morning! It has been one BUSY weekend (and monday) for me, which is the reason for the delay in the announcement of the winner of the challenge.

Before I go into the winner, I want to tell you that I have decided to extend the challenge timeframe for 2 weeks for future challenges.  Next challenge, I will extend the timeframe for entering and then the winner will be announced the DAY BEFORE the next challenge.  ALSO, the TOP 3 selected entries will get to choose 1 Doodle Pantry image of choice!  So, for the second challenge each month, that is 4 chances to win!!

Now for the winner....

Random.org has selected a winner..... linky #4

Random Integer Generator

Here are your random numbers:
4 
Timestamp: 2010-11-30 20:34:18 UTC


Anne's turkey card is so cute and she used the big silk leaves behind her pumpkin card shape to fit the challenge theme.  Congratulations Anne!  I have sent you an email which needs response before you can obtain the prize.

............................................................................
ALL the entries this challenge are absolutely adorable and I thank you for playing along with us!  But, I do like to mention a few project links just to help share the love and spread traffic back to the players.
AND I am doing something NEW this challenge, and I will do it from now on too.... The 3 "top" mentions will receive ONE Doodle Pantry image of choice (excludes digitally pre-colored)!

And now I'd like to mention the top 3!
SHARON: Her scarecrow coloring is so warm and inviting!  Very homely little guy, just gotta love him!

KATHY: Beautiful soft roses using fun paper colors and accents.

KERSTIN: Such a cheerfully and traditionally colored birdie wearing his Santa Hat!

I've sent each top 3 an email, but if you do not receive it, send me an email from the same email you used for your link.  laurie@dooodlepantry.com

Again, a BIG THANK YOU to all participants!  Each challenge brings me a big smile to see what you create and I am honored you choose to share them with us!

Tuesday, November 23, 2010

Tuesday Morning Sketch Challenge Sponsorship

Good morning!
Today we are sponsoring the Tuesday Morning Sketch Challenge, and wow, look at this awesome sketch!  TMS69
I wanted to help get you inspired to go create and also to participate using this awesome sketch.   I hope you can come to Tuesday Morning Sketch Challenge Blog and play along with us this week!
Click the names below to check out Doodle Pantry DT creations using the sketch.

CHRISTA         ALICA         DAWN       SHANNON      PEGGY guest DT

HERE'S MY CARD:
I used the Peaches image and the raspberries from the Pears & Raspberries image on my card with this sketch.  The squares are 1-1/2"  The card is A2 size (4.25" x 5.50").

I printed the images on thin watercolor paper and then watercolored them using a waterbrush and Tombow markers.   I added a little prima on the branches of the Peaches.
SUPPLIES:
  • IMAGES: Peaches by Doodle Pantry and Pears & Raspberries by Doodle Pantry
  • CS/PAPER: Canson 90 lb. watercolor paper, early espresso, Basic Grey Curio DP
  • INK: Laser printer, Tombow markers 847, 177, 946, 942, 912, 899
  • ACCENTS/TOOLS: waterbrush,EK border punch, pearls, sewing machine, PTI ribbon, basic grey button, linen thread, prima flower, glue dots, foam pop dots
  • COLORING: watercolor by Tombow markers and a waterbrush
 ~~~~~~~~~~~~~~~~~~~~~~~~~~~~
Thank you so much for visiting us today!  We hope you are inspired to create!

Saturday, November 20, 2010

Doodle Pantry Digital Challenge #2

Yay!  We made it to our second challenge for the month!
Keyword/Tag: DPDC2

We hope you can join us!

CHALLENGE THEME: 
  1. Use anything that represents branches, leaves, or foliage on your project. These items can be punches, or depicted in the digital image itself, or shaped accents, etc.
  2. You may submit projects using any company DIGITAL image, but it must be a digital image.  However, we of course LOVE to see what you can do with Doodle Pantry Images if at all possible. Feel free to browse the freebie page HERE, if you'd like to use one at no cost.
The prize for one randomly selected participant is a $10 Doodle Pantry Store Coupon!

GENERAL PARTICIPANT GUIDELINES and CHALLENGE RULES
  1. Each challenge has a specific theme and it is expected that you will create something NEW and follow the challenges theme. 
  2. Post your creation on your blog or online public gallery in which a comment can be left.  Post MUST be dated within the time frame of the challenge.  Please, no past creations, create something new!  
  3. The linky widget may state that a URL is not required, but IT IS REQUIRED. You MUST LINK YOUR POST of your project/card
  4. Challenges are open for 1 week (7 full days) and winners posted the following day
  5. Only enter once per each challenge
  6. Keywords or tags for the challenge are DPDC and the number of the challenge, no spaces.
************************************
Here are some of the DT creations to help get your creative juices flowing!
by Jerusha Borden
used punched branches with Birdie Babies
************************************
by Dawn Frost 
added holly leaf accents and Santa Accessories and Shaggy Cat
************************************
by Peggy Timmerman Guest DT 
leaves on the image using Huckleberries
************************************
 by Pat Dadisman
added punched holly leaves using Santa Accessories and Big Hug Bunny
************************************
by Linda Borneman 
added punched branch accents using Mother Sheep & Lamb
************************************
 by Maria Matter
leaves on the image using Holy Land Flowers 1
************************************
 by Laurie Wilson
leaves on the image using Holy Land Flowers 1
SUPPLIES for :
  • DIGITAL IMAGE: Holy Land Flowers I by Doodle Pantry (Camel's thorn images)
  • CS/PAPER: Canson 90 lb. watercolor paper, CDS spring leaf, CDS strawberry jam
  • INK: Laser printer, Tombow markers 133, 847, 990, 991, 192, 177
  • ACCENTS/TOOLS: waterbrush, CDS strawberry jam ribbon, prima flower, pearls, sewing machine, foam pop dots
  • COLORING: watercolor by Tombow markers and a waterbrush
************************************
WINNER (1 winner):
  • ONE winner is randomly selected to win a grand prize of $10 Doodle Pantry Store Coupon.
  • Winner announced on the 28th (day after challenge ends)
************************************
We invite you to come along and play with us this week, and can't wait to see what you create!  Just use leaves or branches on your projects.
Happy creating!
~Laurie

Santa Accessories - How to use

Hello!  I wanted to give you a little picture how-to on how we use the Santa hats in the new digital Santa Accessories set.  It's basically similar to how I showed you to use white-filled PNG files last time.

First place the image in Word or Publisher and resize to desired size.
Then place the desired hat
Finally, move and position the hat on the head,  Resize the hat as you see fit.
Here are a couple more examples of characters and their santa hats...
~~~~~~~~~~~~~~~~~~~~~~~~~~~~~~~~~~~~~~~~
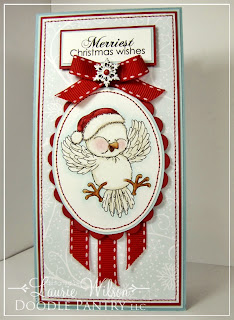
MY FINISHED CARD: 3.25" x 6.25"

SUPPLIES:
  • DIGITAL IMAGES: Santa Accessories and Happy Birdie B by Doodle Pantry
  • CS/PAPER: Canson 90 lb. watercolor paper, red, soft sky, baja breeze, Heidi Grace Designs DP
  • INK: Laser printer, Tombow markers 491, 947, 899, 992, 990, 772, real red marker
  • ACCENTS/TOOLS: waterbrush, SPellbinders ovals dies, CDS red stitch grosgrain ribbon, snowflake charm, CDS micro brad red, sewing machine, foam pop dots, glue dots
  • COLORING: watercolor by Tombow markers and a waterbrush
  • TECHNIQUE: Inserting transparent white filled PNG over top another placed image
 I hope you are inspired to create!  The challenge is posting shortly after this, stay tuned!
~Laurie

New releases today and a SALE!

Good morning!    We have some new images released today (scroll down to view) at Doodle Pantry, but first I need to announce that we are having a
EARLY BIRDIE BLACK FRIDAY SALE!!!!
FROM NOVEMBER 20 THROUGH NOVEMBER 27....
30% OFF EVERYTHING!
Enter DPBLACKFRIDAY2010 into the Coupon field at the bottom of your cart and then click SUBMIT.  Once you see that the coupon has calculated the discount, click checkout. 
NOTE: If you do not click SUBMIT FIRST, then your coupon won't apply.  Doodle Pantry does not offer refunds or future discounts if you don't click submit to get your coupon discount applied.

~~~~~~~~~~~~~~~~~~~~~~~~~~~~~~~~~~~~~~~~~~~~
(Click the product names to go to the store listing to see cards and other project examples)

A tweet baby birdie girl and boy images, set includes 4 sentiments
~~~~~~~~~~~~~~~~~~~~~~~~~~~~~~~~~~~~~~~~~~~~~~~~~
I couldn't resist pairing a baby lamb with the mother sheep, they look so cuddly together!  Also can be used for friendship. 
~~~~~~~~~~~~~~~~~~~~~~~~~~~~~~~~~~~~~~~~~~~~~~~~~~
GO TO HOLY LAND FLOWERS 1 (Star of Bethlehem & camel's thorn)
This is the first set of 3 which consists of flowers that grow in Insrael, and include scriptures and religious sentiments.  The star of bethlehem is a beautiful white 6 petal flower that grows in clusters.  The Camel's thorn is also called Persian Manna plant and/or Camelgrass.  It has long sharp thorns on which the prettiest of delicate flowers bud off from.  The plant looks like a weed and grows in tall skinny stems. When I saw this thorny plant, I imagined it might be the type of thorny plant that was shaped and placed on Christ's head on the cross.

~~~~~~~~~~~~~~~~~~~~~~~~~~~~~~~~~~~~~~~~~~~~~~~~~~
I grew up in Washington state where there are woodsy mountain areas that harbor wild berry plants, like the huckleberry.  It is similar to a blueberry but has a distinct flavor and is actually in a different plant class.  I had to include the old slang saying "I'll be your huckleberry" and it more commonly means "I am the right person for your task" or "I am the one for you". Doc Holliday was known to have used this phrase, although I don't think he coined it.
~~~~~~~~~~~~~~~~~~~~~~~~~~~~~~~~~~~~~~~~~~~~~~~~~~
I love the Big Hug Bunny so much that I had to have him holding/giving a carrot too!
~~~~~~~~~~~~~~~~~~~~~~~~~~~~~~~~~~~~~~~~~~~~~~~~~~
This was a request by a Design Team member.  She wanted santa hats for many of the Doodle Pantry characters.  There are also presents that can be used individually.
HOW TO USE: There will be a post focusing on this after this post.   Place your character image first, then insert (or add layer) the PNG file of the santa hat you want to use and position it over the head until it looks like it is in the right spot.  In rare instances, you may need to edit/erase away parts of the character head, but I tried to draw them so that you wouldn't have to do that.
EXAMPLES OF THE HATS PLACED OVER TOP CHARACTERS
My Design Team also have told me that the Sheep hat can be used on the Sweet giraffe too!
~~~~~~~~~~~~~~~~~~~~~~~~~~~~~~~~~~~~~~~~~~~~~~~~~~
I wanted to re-do the original Happy Birdie with rounded feathers and also inlcude a lime green digitally colored version.
~~~~~~~~~~~~~~~~~~~~~~~~~~~~~~~~~~~~~~~~~~~~~~~~~~

 The challenge is posted right after this post, so we hope you'll play along with us!

Sunday, November 14, 2010

Winner and top 3 for DPDC1

Good afternoon! 
I'd like to give a great BIG thank you to everyone who shared your talent to participate in our challenge DPDC1 this past week!    I enjoyed seeing everyone's creations and it was SO HARD to choose just 3 honorable mentions.

I also want to tell you that I have emailed everyone their complimentary Sheep Dreams digital set.  If you have not received yours, please check junk and spam folders first, and then if you still can't find it, please email me laurie@doodlepantry.com from the SAME EMAIL that you used in your linky link, and then I will be sure to get it to you today.

The top 3 honorable mentions are...
ROBBIE STOCKTON  - I liked how she used a portion of the image, and the coloring is fabulous
GLENDA ATKINS - The blue & white is so fresh and the snow theme is adorable
SUZIE MCFLOOZY - Her coloring is lovely and the sparkly fluff to accent the clothes is a darling touch

AND THE ONE RANDOMLY SELECTED WINNER OF THE $20 DOODLE PANTRY GIFT COUPON IS....
~~~~~~~~~~~~~~~~~~~~~~~~~~~~~~~~~~~~~~~~~~~~~~~~
INLINKZ ENTRANT NUMBER 1 !!!

Congratulations Lisa!   I have emailed you using the email you used on your link, but you can also email me direct to redeem your prize.
Thank you again to everyone for helping make this challenge a success!

Thursday, November 11, 2010

Striped Shaggy Cat Color Tutorial

Hello friends!
Here is a coloring tutorial for the Shaggy Cat image.  I had to make my neighbors a thank you card today.  They cat sat for 9 days while we were out of town, and they must have taken really good care of her because she wasn't even mad at us when we got back, LOL.  I colored the cat to match my kitty, a gray stripe tabby.

Finished Card:
Coloring items needed:
  • Waterbrush
  • Paper towel for wiping waterbrush tip
  • Tombow markers 133, 126, N65, N75, 990, 526, 491, 312, and S'U! early espresso marker
I added 990 and 491 around the objects.
Using the waterbrush, I just swept the brush tip back and forth and then away from the image, all around each object until blended out.
Next step add the dark gray N65 to the seat base and blend.
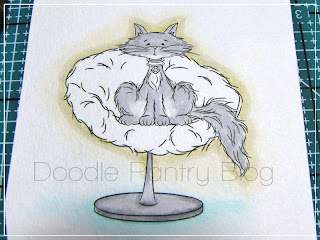
I added the lighter gray N75 to the kitties body and left a few areas without color, the chin, the chest, and underside behind the front legs.  Blend with waterbrush by starting in the white areas and moving outward.  For this coat, I am just laying down the base color, so I am not  too worried about shading yet.
Using the darker gray N65 fine tip, add some short strokes, in lines, for where you want stripes, and then inside ears.
Make sure the brush flow is slightly wet, but not fast flowing out of the tip. You can do this by brushing on a paper towel and you can see how much water is soaked by the towel. Once the flow is slight, touch the tip of the waterbrush to the darker strokes on the face and lightly brush in a quick squiggle motion across each darker gray lines, until blended like below. I also added some dots on the cheeks and blended those.
Similar idea for the body now, use the darker gray and add short strokes in the shape of stripes on the fur.
With light waterflow in the waterbrush, blend the darker gray into the lighter gray areas.
 Chair: I loosely added color to the main areas of the chair with the lightest lime green 133.  Do not waterbrush yet.  I also colored the collar and jewel with 526 and 312, but didn't water blend those.
Add the darker lime green 126 to the undersides and shadows on the fuzzy chair. You can now add the waterbrush and start in the lighter green areas and work your way in small circles or strokes in outward directions until you get to the edges of the chair.
 After a quick blend, it should look like below.
Here is where I needed to add a darker shadow only on the south and north sides of the chair, I used SU Early Espresso marker.  Add just a small amount of the darker color, hugging the edges. Touch it with the waterbrush tip and pull outward.
Below shows the darker "highlights", which help accentuate and make the kitty chair pop out.
Once the chair color was dry, I decided I wanted a bit more contrast in the shadows on the fur on the chair. I added more of the darker lime color 126 in the shadow areas and you can see that below.
Finally, blended the extra shadows by touching the brush to the lighter areas and moving it toward the shadow colors. Try not to overblend or the paper will pill up.

Finished card close-up detail:
I added the white gel pen highlights to the chair stand and the sparkle fibers after the card was completely put together.  I first put some of the Flower Soft glue onto my fingertip and then quickly rubbed a thin layer of it over one half of the chair. Quickly (because it dries fast) sprinkled a tiny bit of the sparkle fibers over it and then used a clean finger to push it in. Tapped off excess and did the other side the same way. It adds just enough sparkle and fluff but not too much, and I can still see the color underneath since the Flower Soft glue dries clear.
SUPPLIES:
  • Digital Image: Shaggy Cat by Doodle Pantry
  • CS/paper: 90 lb. Canson waterclor paper, SU not quite navy, SU retired Kiwi Kiss, Basic Grey Marjolaine DP
  • Ink: Laser printer, Tombow markers 133, 126, N65, N75, 990, 526, 491, 312, and S'U! early espresso marker, white gel pen (on chair base stand)
  • Accents/Tools: waterbrush, circle punch, inverted scallop circle die, corner rounder punch, flower soft glue and sparkle fibers lime, patina stickles (on collar jewel), sewing machine, Offray walmart ribbon "lemongrass" color, retired Su button, linen thread, pearls, foam pop dots

Thanks for visiting today and hope you enjoyed a little coloring tutorial!