First place the image in Word or Publisher and resize to desired size.
Then place the desired hat
Finally, move and position the hat on the head, Resize the hat as you see fit.
Here are a couple more examples of characters and their santa hats...
~~~~~~~~~~~~~~~~~~~~~~~~~~~~~~~~~~~~~~~~
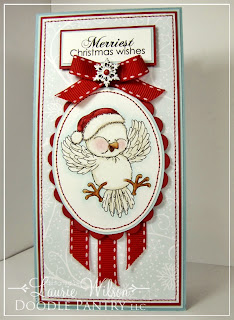
MY FINISHED CARD: 3.25" x 6.25"SUPPLIES:
- DIGITAL IMAGES: Santa Accessories and Happy Birdie B by Doodle Pantry
- CS/PAPER: Canson 90 lb. watercolor paper, red, soft sky, baja breeze, Heidi Grace Designs DP
- INK: Laser printer, Tombow markers 491, 947, 899, 992, 990, 772, real red marker
- ACCENTS/TOOLS: waterbrush, SPellbinders ovals dies, CDS red stitch grosgrain ribbon, snowflake charm, CDS micro brad red, sewing machine, foam pop dots, glue dots
- COLORING: watercolor by Tombow markers and a waterbrush
- TECHNIQUE: Inserting transparent white filled PNG over top another placed image
~Laurie


3 comments:
Ooooh your birdie card is gorgeous! Love that dp paper, its so subtle but adds so much. I love it!
Oh I am so glad that I found the Santa Accessories. That Little Birdie put a giggle in my step. He is Just Darling.
How much more do you like the Laser Ink over the Inkjet. I have a Laser printer on my wishlist for Santa. I hope I will get as much use out of it as I dream I will.
Merry Christmas and Thanks for the Talent!
Jules
Oh WOWIE Laurie... what a GORGEOUS santa birdie card!! LOVE your shading/coloring... stitching around your oval etc. This accessory pack below looks fabulous too. Think I'm gonna have to get that for my birdies. ;) You provide such awesome inspiration in every one of your cards! THANK YOU! =)
P.S.
Almost done with my challenge card, LOL. Hope to post it tonight.
Post a Comment