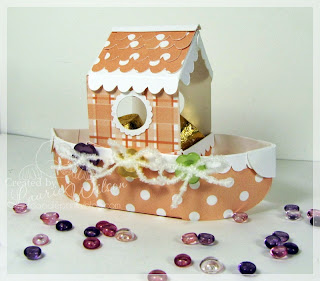
I wanted to take a moment to show you the new Noah's Ark Favor box. It also can double as a tugboat. Perfect for giving treats at baby showers, sunday school parties, or VBS take home bags. (NOTE: this template is not recommended for assembly by young children)
The price has been reduced to only $4.00! The template comes with 2 versions of a printable cut yourself template, and also SVG files to use with your e-cut software and Cricut, PNG images to place over digital patterned paper if you want to cut yourself, an instruction reference sheet with dimensions for scoring, and some wood and roof digital papers. WOW!
The finished box is about 4-1/4" long, 1-5/8" wide and 2-1/4" tall.
The 2 versions of the box are one with scalloped edges, and the other has extended straight edges so you can use your own edge punch. (NOTE: Smaller edge punches work best, as the extended sections are only 5/8" long.)
Here is the scallop edge version assembled. On this favor box, I used the new Baby basics Digi paper pack. I printed 2 of the pink patterns of paper on a full sheet and cut them each in half. The digi paper only printed on one side leaving the other side white, which is the color that I wanted as my accent color, so it worked well when I folded the scallop edges over on the sides of the box.
I placed half of each patterned sheet on my Cricut cutting mat and then a scrap of white.
When I imported the SVG files into my Sure Cuts a Lot program, I broke them apart and then deleted the pieces not needed. Then I moved the remaining pieces around to be on the "mat" in the program so that they would cut on where I placed my cardstock on the mat.
Below you can see my sheets after I cut. There are several pieces left over on the patterned papers to use for tags or other embellishments, or even a matching gift card.
The housing insert gets printed on one patterned paper design, the ark base and the 4 roof layers get put on another pattern paper design, and then the roof base, window frames, roof accent, and corner accents get cut on the accenting cardstock, in my case, the white.
Use the reference sheet to find scoring lines and crease all scores before assembling per the instruction sheet.
Here I used the extended edge box version and used my own edge punch on the edges to get a different look. This time I used double sided patterned paper.
Here is this box before I assembled the pieces. The pieces have been punched, scored and creased.
~~~~~~~~~~~~~~~~~~~~~~~~~
Thanks for visiting today! Wishing you a wonderful weekend and hope you can bless someone with a handcrafted card or gift!


2 comments:
these are so cool...i love the colors i should try this thanks for the inspiration
Tina
Laurie, you are amazing! What a gorgeous creation! Hmmmm...can the 'house' part be used by itself? A bird house for your darling birds perhaps??? Love it!
Post a Comment